# Creating a project

Learn how to create an organization or user project.

Projects are an adaptable collection of items that stay up-to-date with GitHub data. Your projects can track issues, pull requests, and ideas that you note down. You can add custom fields and create views for specific purposes.

You can also choose to use an existing project as a template and copy the views and custom fields to a new project. For more information, see [Copying an existing project](/en/issues/planning-and-tracking-with-projects/creating-projects/copying-an-existing-project).

## Creating a project

### Creating an organization project

Organization projects can track issues and pull requests from the organization's repositories. You can also set projects in your organization as templates, and curate a list of recommended templates to highlight,  that other organization members can then use as the base for the projects they create. For more information, see [Managing project templates in your organization](/en/issues/planning-and-tracking-with-projects/managing-your-project/managing-project-templates-in-your-organization).

1. In the upper-right corner of GitHub, click your profile picture, then click **<svg version="1.1" width="16" height="16" viewBox="0 0 16 16" class="octicon octicon-organization" aria-label="organization" role="img"><path d="M1.75 16A1.75 1.75 0 0 1 0 14.25V1.75C0 .784.784 0 1.75 0h8.5C11.216 0 12 .784 12 1.75v12.5c0 .085-.006.168-.018.25h2.268a.25.25 0 0 0 .25-.25V8.285a.25.25 0 0 0-.111-.208l-1.055-.703a.749.749 0 1 1 .832-1.248l1.055.703c.487.325.779.871.779 1.456v5.965A1.75 1.75 0 0 1 14.25 16h-3.5a.766.766 0 0 1-.197-.026c-.099.017-.2.026-.303.026h-3a.75.75 0 0 1-.75-.75V14h-1v1.25a.75.75 0 0 1-.75.75Zm-.25-1.75c0 .138.112.25.25.25H4v-1.25a.75.75 0 0 1 .75-.75h2.5a.75.75 0 0 1 .75.75v1.25h2.25a.25.25 0 0 0 .25-.25V1.75a.25.25 0 0 0-.25-.25h-8.5a.25.25 0 0 0-.25.25ZM3.75 6h.5a.75.75 0 0 1 0 1.5h-.5a.75.75 0 0 1 0-1.5ZM3 3.75A.75.75 0 0 1 3.75 3h.5a.75.75 0 0 1 0 1.5h-.5A.75.75 0 0 1 3 3.75Zm4 3A.75.75 0 0 1 7.75 6h.5a.75.75 0 0 1 0 1.5h-.5A.75.75 0 0 1 7 6.75ZM7.75 3h.5a.75.75 0 0 1 0 1.5h-.5a.75.75 0 0 1 0-1.5ZM3 9.75A.75.75 0 0 1 3.75 9h.5a.75.75 0 0 1 0 1.5h-.5A.75.75 0 0 1 3 9.75ZM7.75 9h.5a.75.75 0 0 1 0 1.5h-.5a.75.75 0 0 1 0-1.5Z"></path></svg> Organizations**.
2. Click the name of your organization.
3. Under your organization name, click **<svg version="1.1" width="16" height="16" viewBox="0 0 16 16" class="octicon octicon-table" aria-label="table" role="img"><path d="M0 1.75C0 .784.784 0 1.75 0h12.5C15.216 0 16 .784 16 1.75v12.5A1.75 1.75 0 0 1 14.25 16H1.75A1.75 1.75 0 0 1 0 14.25ZM6.5 6.5v8h7.75a.25.25 0 0 0 .25-.25V6.5Zm8-1.5V1.75a.25.25 0 0 0-.25-.25H6.5V5Zm-13 1.5v7.75c0 .138.112.25.25.25H5v-8ZM5 5V1.5H1.75a.25.25 0 0 0-.25.25V5Z"></path></svg> Projects**.

   ![Screenshot showing profile tabs. The 'Projects' tab is highlighted with an orange outline.](/assets/images/help/projects-v2/tab-projects.png)
4. Click **New project**.
5. Select which type of project or template you want to use.
   * To create a blank project, under "Start from scratch," click **Table**, **Roadmap**, or **Board**.
   * To create a project from a template, click the template you want to use. You can select from the built-in templates curated by GitHub, the templates created by your organization, and the recommended templates that have been chosen by your organization.
6. Optionally, if you selected a template, review the fields, views, workflows, and insights that will be created.
7. In the text box under "Project name," type a name for your new project.
8. Optionally, start your project with items already added by selecting **Import items from repository**. All new and existing items from the chosen repository will be added to your project, and it will be designated as your project's default repository.
9. Click **Create project**.

### Creating a user project

User projects can track issues and pull requests from the repositories owned by your personal account.

1. In the top right corner of GitHub, click your profile picture, then click **Your profile**.

   ![Screenshot of the dropdown menu under @octocat's profile picture. "Your profile" is outlined in dark orange.](/assets/images/help/profile/profile-button-avatar-menu-global-nav-update.png)

2. On your profile, click **<svg version="1.1" width="16" height="16" viewBox="0 0 16 16" class="octicon octicon-table" aria-label="table" role="img"><path d="M0 1.75C0 .784.784 0 1.75 0h12.5C15.216 0 16 .784 16 1.75v12.5A1.75 1.75 0 0 1 14.25 16H1.75A1.75 1.75 0 0 1 0 14.25ZM6.5 6.5v8h7.75a.25.25 0 0 0 .25-.25V6.5Zm8-1.5V1.75a.25.25 0 0 0-.25-.25H6.5V5Zm-13 1.5v7.75c0 .138.112.25.25.25H5v-8ZM5 5V1.5H1.75a.25.25 0 0 0-.25.25V5Z"></path></svg> Projects**.

   ![Screenshot showing profile tabs. The 'Projects' tab is highlighted with an orange outline.](/assets/images/help/projects-v2/tab-projects.png)

3. Click **New project**.

4. Select which type of project or template you want to use.
   * To create a blank project, under "Start from scratch", click **Table**, **Roadmap**, or **Board**.
   * To create a project from a template, click the built-in template that you want to use.

5. Optionally, if you selected a template, review the fields, views, workflows, and insights that will be created.

6. In the text box under "Project name", type a name for your new project.

7. Click **Create project**.

## Updating your project description and README

You can set your project's description and README to share the purpose of your project, provide instructions on how to use the project, and include any relevant links.

1. Navigate to your project.

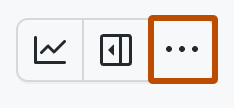
2. In the top-right, click <svg version="1.1" width="16" height="16" viewBox="0 0 16 16" class="octicon octicon-kebab-horizontal" aria-label="More options" role="img"><path d="M8 9a1.5 1.5 0 1 0 0-3 1.5 1.5 0 0 0 0 3ZM1.5 9a1.5 1.5 0 1 0 0-3 1.5 1.5 0 0 0 0 3Zm13 0a1.5 1.5 0 1 0 0-3 1.5 1.5 0 0 0 0 3Z"></path></svg> to open the menu.

   ![Screenshot showing a project's menu bar. The menu icon is highlighted with an orange outline.](/assets/images/help/projects-v2/open-menu.png)

3. In the menu, click **<svg version="1.1" width="16" height="16" viewBox="0 0 16 16" class="octicon octicon-gear" aria-label="gear" role="img"><path d="M8 0a8.2 8.2 0 0 1 .701.031C9.444.095 9.99.645 10.16 1.29l.288 1.107c.018.066.079.158.212.224.231.114.454.243.668.386.123.082.233.09.299.071l1.103-.303c.644-.176 1.392.021 1.82.63.27.385.506.792.704 1.218.315.675.111 1.422-.364 1.891l-.814.806c-.049.048-.098.147-.088.294.016.257.016.515 0 .772-.01.147.038.246.088.294l.814.806c.475.469.679 1.216.364 1.891a7.977 7.977 0 0 1-.704 1.217c-.428.61-1.176.807-1.82.63l-1.102-.302c-.067-.019-.177-.011-.3.071a5.909 5.909 0 0 1-.668.386c-.133.066-.194.158-.211.224l-.29 1.106c-.168.646-.715 1.196-1.458 1.26a8.006 8.006 0 0 1-1.402 0c-.743-.064-1.289-.614-1.458-1.26l-.289-1.106c-.018-.066-.079-.158-.212-.224a5.738 5.738 0 0 1-.668-.386c-.123-.082-.233-.09-.299-.071l-1.103.303c-.644.176-1.392-.021-1.82-.63a8.12 8.12 0 0 1-.704-1.218c-.315-.675-.111-1.422.363-1.891l.815-.806c.05-.048.098-.147.088-.294a6.214 6.214 0 0 1 0-.772c.01-.147-.038-.246-.088-.294l-.815-.806C.635 6.045.431 5.298.746 4.623a7.92 7.92 0 0 1 .704-1.217c.428-.61 1.176-.807 1.82-.63l1.102.302c.067.019.177.011.3-.071.214-.143.437-.272.668-.386.133-.066.194-.158.211-.224l.29-1.106C6.009.645 6.556.095 7.299.03 7.53.01 7.764 0 8 0Zm-.571 1.525c-.036.003-.108.036-.137.146l-.289 1.105c-.147.561-.549.967-.998 1.189-.173.086-.34.183-.5.29-.417.278-.97.423-1.529.27l-1.103-.303c-.109-.03-.175.016-.195.045-.22.312-.412.644-.573.99-.014.031-.021.11.059.19l.815.806c.411.406.562.957.53 1.456a4.709 4.709 0 0 0 0 .582c.032.499-.119 1.05-.53 1.456l-.815.806c-.081.08-.073.159-.059.19.162.346.353.677.573.989.02.03.085.076.195.046l1.102-.303c.56-.153 1.113-.008 1.53.27.161.107.328.204.501.29.447.222.85.629.997 1.189l.289 1.105c.029.109.101.143.137.146a6.6 6.6 0 0 0 1.142 0c.036-.003.108-.036.137-.146l.289-1.105c.147-.561.549-.967.998-1.189.173-.086.34-.183.5-.29.417-.278.97-.423 1.529-.27l1.103.303c.109.029.175-.016.195-.045.22-.313.411-.644.573-.99.014-.031.021-.11-.059-.19l-.815-.806c-.411-.406-.562-.957-.53-1.456a4.709 4.709 0 0 0 0-.582c-.032-.499.119-1.05.53-1.456l.815-.806c.081-.08.073-.159.059-.19a6.464 6.464 0 0 0-.573-.989c-.02-.03-.085-.076-.195-.046l-1.102.303c-.56.153-1.113.008-1.53-.27a4.44 4.44 0 0 0-.501-.29c-.447-.222-.85-.629-.997-1.189l-.289-1.105c-.029-.11-.101-.143-.137-.146a6.6 6.6 0 0 0-1.142 0ZM11 8a3 3 0 1 1-6 0 3 3 0 0 1 6 0ZM9.5 8a1.5 1.5 0 1 0-3.001.001A1.5 1.5 0 0 0 9.5 8Z"></path></svg> Settings** to access the project settings.

4. To add a short description to your project, under "Add a description", type your description in the text box and click **Save**.

5. To update your project's README, under "README", type your content in the text box.
   * You can format your README using Markdown. For more information, see [Basic writing and formatting syntax](/en/get-started/writing-on-github/getting-started-with-writing-and-formatting-on-github/basic-writing-and-formatting-syntax).
   * To toggle between the text box and a preview of your changes, click <svg version="1.1" width="16" height="16" viewBox="0 0 16 16" class="octicon octicon-eye" aria-label="The preview icon" role="img"><path d="M8 2c1.981 0 3.671.992 4.933 2.078 1.27 1.091 2.187 2.345 2.637 3.023a1.62 1.62 0 0 1 0 1.798c-.45.678-1.367 1.932-2.637 3.023C11.67 13.008 9.981 14 8 14c-1.981 0-3.671-.992-4.933-2.078C1.797 10.83.88 9.576.43 8.898a1.62 1.62 0 0 1 0-1.798c.45-.677 1.367-1.931 2.637-3.022C4.33 2.992 6.019 2 8 2ZM1.679 7.932a.12.12 0 0 0 0 .136c.411.622 1.241 1.75 2.366 2.717C5.176 11.758 6.527 12.5 8 12.5c1.473 0 2.825-.742 3.955-1.715 1.124-.967 1.954-2.096 2.366-2.717a.12.12 0 0 0 0-.136c-.412-.621-1.242-1.75-2.366-2.717C10.824 4.242 9.473 3.5 8 3.5c-1.473 0-2.825.742-3.955 1.715-1.124.967-1.954 2.096-2.366 2.717ZM8 10a2 2 0 1 1-.001-3.999A2 2 0 0 1 8 10Z"></path></svg> or <svg version="1.1" width="16" height="16" viewBox="0 0 16 16" class="octicon octicon-pencil" aria-label="The edit icon" role="img"><path d="M11.013 1.427a1.75 1.75 0 0 1 2.474 0l1.086 1.086a1.75 1.75 0 0 1 0 2.474l-8.61 8.61c-.21.21-.47.364-.756.445l-3.251.93a.75.75 0 0 1-.927-.928l.929-3.25c.081-.286.235-.547.445-.758l8.61-8.61Zm.176 4.823L9.75 4.81l-6.286 6.287a.253.253 0 0 0-.064.108l-.558 1.953 1.953-.558a.253.253 0 0 0 .108-.064Zm1.238-3.763a.25.25 0 0 0-.354 0L10.811 3.75l1.439 1.44 1.263-1.263a.25.25 0 0 0 0-.354Z"></path></svg>.

6. To save changes to your README, click **Save**.

You can view and make quick changes to your project description and README by navigating to your project and clicking <svg version="1.1" width="16" height="16" viewBox="0 0 16 16" class="octicon octicon-sidebar-expand" aria-label="The sidebar icon" role="img"><path d="m4.177 7.823 2.396-2.396A.25.25 0 0 1 7 5.604v4.792a.25.25 0 0 1-.427.177L4.177 8.177a.25.25 0 0 1 0-.354Z"></path><path d="M0 1.75C0 .784.784 0 1.75 0h12.5C15.216 0 16 .784 16 1.75v12.5A1.75 1.75 0 0 1 14.25 16H1.75A1.75 1.75 0 0 1 0 14.25Zm1.75-.25a.25.25 0 0 0-.25.25v12.5c0 .138.112.25.25.25H9.5v-13Zm12.5 13a.25.25 0 0 0 .25-.25V1.75a.25.25 0 0 0-.25-.25H11v13Z"></path></svg> in the top right.

## Further reading

* [Adding your project to a repository](/en/issues/planning-and-tracking-with-projects/managing-your-project/adding-your-project-to-a-repository)
* [Adding items to your project](/en/issues/planning-and-tracking-with-projects/managing-items-in-your-project/adding-items-to-your-project)
* [Changing the layout of a view](/en/issues/planning-and-tracking-with-projects/customizing-views-in-your-project/changing-the-layout-of-a-view)