# Adding items automatically

You can configure your project's built-in workflows to automatically add items from repositories that match a filter.

## About automatically adding items

You can configure your project's built-in workflows to automatically add new items as they are created or updated in a repository. You can define a filter to only add items that meet your criteria.  You can also create multiple auto-add workflows, each workflow can have a unique filter and target a different repository.

When you enable the auto-add workflow, existing items matching your criteria will not be added. The workflow will add items when created or updated if the item matches your filter. For more information on manually adding items, see [Adding items to your project](/en/issues/planning-and-tracking-with-projects/managing-items-in-your-project/adding-items-to-your-project#bulk-adding-issues-and-pull-requests).

The auto-add workflow supports a subset of filters. You can use the following filters when configuring your workflow.

| Qualifier  | Possible values                        |
| ---------- | -------------------------------------- |
| `is`       | open, closed, merged, draft, issue, pr |
| `label`    | "label name"                           |
| `reason`   | completed, reopened, "not planned"     |
| `assignee` | GitHub username                        |
| `no`       | label, assignee, reason                |

All filters, other than `no`, support negation. For example, you could use `-label:bug` to add issues that do not have the "bug" label.

The auto-add workflow is limited per plan.

| Product                  | Maximum auto-add workflows |
| ------------------------ | -------------------------- |
| GitHub Free              | 1                          |
| GitHub Pro               | 5                          |
| GitHub Team              | 5                          |
| GitHub Enterprise Cloud  | 20                         |
| GitHub Enterprise Server | 20                         |

## Configuring the auto-add workflow in your project

1. Navigate to your project.

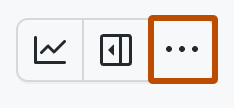
2. In the top-right, click <svg version="1.1" width="16" height="16" viewBox="0 0 16 16" class="octicon octicon-kebab-horizontal" aria-label="The menu icon" role="img"><path d="M8 9a1.5 1.5 0 1 0 0-3 1.5 1.5 0 0 0 0 3ZM1.5 9a1.5 1.5 0 1 0 0-3 1.5 1.5 0 0 0 0 3Zm13 0a1.5 1.5 0 1 0 0-3 1.5 1.5 0 0 0 0 3Z"></path></svg> to open the menu.

   ![Screenshot showing a project's menu bar. The menu icon is highlighted with an orange outline.](/assets/images/help/projects-v2/open-menu.png)

3. In the menu, click **<svg version="1.1" width="16" height="16" viewBox="0 0 16 16" class="octicon octicon-workflow" aria-label="workflow" role="img"><path d="M0 1.75C0 .784.784 0 1.75 0h3.5C6.216 0 7 .784 7 1.75v3.5A1.75 1.75 0 0 1 5.25 7H4v4a1 1 0 0 0 1 1h4v-1.25C9 9.784 9.784 9 10.75 9h3.5c.966 0 1.75.784 1.75 1.75v3.5A1.75 1.75 0 0 1 14.25 16h-3.5A1.75 1.75 0 0 1 9 14.25v-.75H5A2.5 2.5 0 0 1 2.5 11V7h-.75A1.75 1.75 0 0 1 0 5.25Zm1.75-.25a.25.25 0 0 0-.25.25v3.5c0 .138.112.25.25.25h3.5a.25.25 0 0 0 .25-.25v-3.5a.25.25 0 0 0-.25-.25Zm9 9a.25.25 0 0 0-.25.25v3.5c0 .138.112.25.25.25h3.5a.25.25 0 0 0 .25-.25v-3.5a.25.25 0 0 0-.25-.25Z"></path></svg> Workflows**.

4. In the "Default workflows" list, click **Auto-add to project** or one of the auto-add workflows you have previously duplicated.

5. To start editing the workflow, in the top right, click **Edit**.

   ![Screenshot showing the workflow menu bar. The "Edit" button is highlighted with an orange rectangle.](/assets/images/help/projects-v2/workflow-start-editing.png)

6. Under "Filters", select the repository you want to add items from.

7. Next to the repository selection, type the filter criteria you want items to match before they are automatically added to your project.

8. To enable the new workflow, click **Save and turn on workflow**.

## Duplicating the auto-add workflow

You can create additional duplicates of the auto-add workflow, up to a maximum defined for your plan (see the table earlier in this article). Each workflow can target a different repository. You can target the same repository with multiple workflows if the filter is unique for each workflow.

Once you have duplicated a workflow, you can click **Edit** to start making changes to it. For more information, see [Configuring the auto-add workflow in your project](#configuring-the-auto-add-workflow-in-your-project).

1. Navigate to your project.

2. In the top-right, click <svg version="1.1" width="16" height="16" viewBox="0 0 16 16" class="octicon octicon-kebab-horizontal" aria-label="The menu icon" role="img"><path d="M8 9a1.5 1.5 0 1 0 0-3 1.5 1.5 0 0 0 0 3ZM1.5 9a1.5 1.5 0 1 0 0-3 1.5 1.5 0 0 0 0 3Zm13 0a1.5 1.5 0 1 0 0-3 1.5 1.5 0 0 0 0 3Z"></path></svg> to open the menu.

   ![Screenshot showing a project's menu bar. The menu icon is highlighted with an orange outline.](/assets/images/help/projects-v2/open-menu.png)

3. In the menu, click **<svg version="1.1" width="16" height="16" viewBox="0 0 16 16" class="octicon octicon-workflow" aria-label="workflow" role="img"><path d="M0 1.75C0 .784.784 0 1.75 0h3.5C6.216 0 7 .784 7 1.75v3.5A1.75 1.75 0 0 1 5.25 7H4v4a1 1 0 0 0 1 1h4v-1.25C9 9.784 9.784 9 10.75 9h3.5c.966 0 1.75.784 1.75 1.75v3.5A1.75 1.75 0 0 1 14.25 16h-3.5A1.75 1.75 0 0 1 9 14.25v-.75H5A2.5 2.5 0 0 1 2.5 11V7h-.75A1.75 1.75 0 0 1 0 5.25Zm1.75-.25a.25.25 0 0 0-.25.25v3.5c0 .138.112.25.25.25h3.5a.25.25 0 0 0 .25-.25v-3.5a.25.25 0 0 0-.25-.25Zm9 9a.25.25 0 0 0-.25.25v3.5c0 .138.112.25.25.25h3.5a.25.25 0 0 0 .25-.25v-3.5a.25.25 0 0 0-.25-.25Z"></path></svg> Workflows**.

4. In the list of workflows, next to "Auto-add to project" click <svg version="1.1" width="16" height="16" viewBox="0 0 16 16" class="octicon octicon-kebab-horizontal" aria-label="kebab-horizontal" role="img"><path d="M8 9a1.5 1.5 0 1 0 0-3 1.5 1.5 0 0 0 0 3ZM1.5 9a1.5 1.5 0 1 0 0-3 1.5 1.5 0 0 0 0 3Zm13 0a1.5 1.5 0 1 0 0-3 1.5 1.5 0 0 0 0 3Z"></path></svg>.

   ![Screenshot showing the list of workflows. The ellipsis button next to the auto-add workflow is highlighted with an orange rectangle.](/assets/images/help/projects-v2/workflow-add-menu.png)

5. In the menu, click **<svg version="1.1" width="16" height="16" viewBox="0 0 16 16" class="octicon octicon-copy" aria-label="duplicate" role="img"><path d="M0 6.75C0 5.784.784 5 1.75 5h1.5a.75.75 0 0 1 0 1.5h-1.5a.25.25 0 0 0-.25.25v7.5c0 .138.112.25.25.25h7.5a.25.25 0 0 0 .25-.25v-1.5a.75.75 0 0 1 1.5 0v1.5A1.75 1.75 0 0 1 9.25 16h-7.5A1.75 1.75 0 0 1 0 14.25Z"></path><path d="M5 1.75C5 .784 5.784 0 6.75 0h7.5C15.216 0 16 .784 16 1.75v7.5A1.75 1.75 0 0 1 14.25 11h-7.5A1.75 1.75 0 0 1 5 9.25Zm1.75-.25a.25.25 0 0 0-.25.25v7.5c0 .138.112.25.25.25h7.5a.25.25 0 0 0 .25-.25v-7.5a.25.25 0 0 0-.25-.25Z"></path></svg> Duplicate workflow**.

6. To save your new workflow, when prompted, type the name you want to use for the new workflow.

## Further reading

* [Archiving items from your project](/en/issues/planning-and-tracking-with-projects/managing-items-in-your-project/archiving-items-from-your-project)
* [Using the built-in automations](/en/issues/planning-and-tracking-with-projects/automating-your-project/using-the-built-in-automations)